Posts belonging to Category Technology


Blood and Sweat…

… but no tears, unless you count the sweat getting in my eyes. 

I bought a dual-band radio (Yaesu FT-7800) for the truck about a month ago, but had been procrastinating the installation.  First, because of the heat.  Second, because I hate dealing with automotive installs.  This install did nothing to relieve me of my dislike.  It was almost as if GM intentionally designed the vehicle to be difficult to install after-market equipment into (and I’ve got the scrapes and bruises to prove it).  I think that I’ll take my next (non-GM) vehicle to a custom stereo shop or something and let the pros handle it.

Anyhow, I eventually managed to get everything wired and installed.  But I nearly gave myself heat exhaustion in the process.

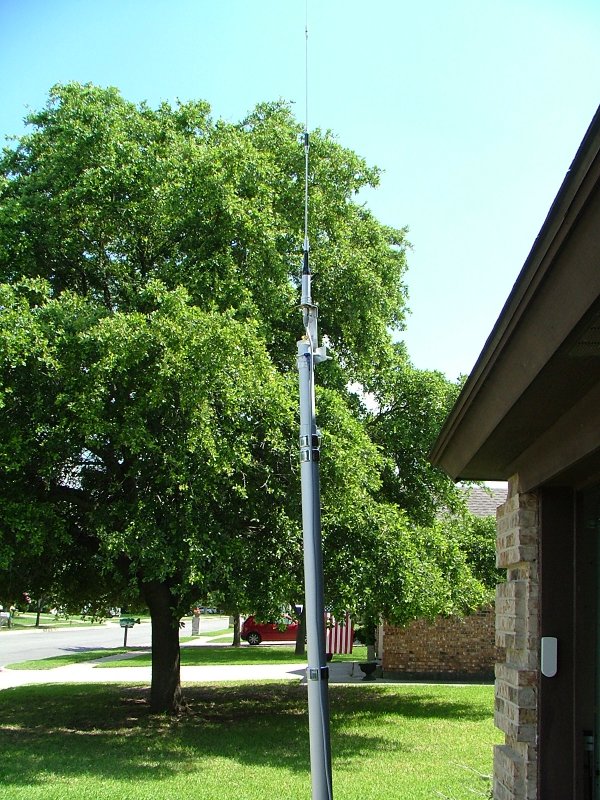
The first problem to solve was how to mount the antenna.  The best location for an antenna is generally in the center of the roof to give maximum height to the antenna and to maximize the ground plane.  However, in this case my Avalanche has a sunroof and I also wanted to be able to park it in the garage.  Because of its size and ground clearance (it’s the Z71 model), there is only about 3 or 4 inches clearance between the roof and the garage door, leaving no room for an antenna.  After a lot of searching I came across the Pro.Fit antenna mount model AVANTPF, which mounts to an existing bolt under the hood (see here for a better picture). 

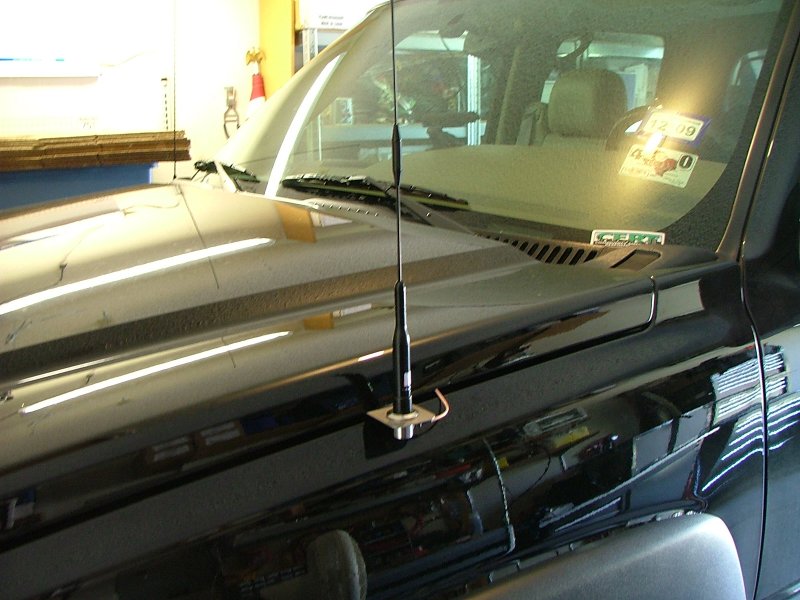
While it claims to be a fit for the 2004-2006 Avalanches, I found that it didn’t quite fit into the slot in the left fender, so I had to take my Dremel and cut a small notch in the upper left part of the bracket to get everything to line up.  Unfortunately, while the antenna shown easily clears the garage door, it has a bad SWR reading (1.9:1).  I have another antenna that gets a 1.2:1 reading, but it is about 2 inches too long to clear the door.  For now I will just install the big antenna when I leave if I plan to use the radio.  In the meantime, I will be continuing the search for a decent antenna that’s short enough to clear the door. 

The next problem was where to put the radio itself.  There was no option to mount the entire radio in the console without cutting up the center console, so I ended up using the remote-head option.  The main body of the radio is in the center console under the cup holders (which are contained in a fairly easy to remove insert, so it will be easy to get to the radio in the future).  I put the remote head on the dash bezel, just above the top of the center console.  The speaker is mounted on the right lower dash (just above the driver’s knee).  The last thing I installed was the mic bracket.  Unfortunately, I think the heat was getting to me by then, because it turns out that you can’t shift into Drive if the mic is on the bracket.  That will teach me to always check clearances before installing something (I did it for everything else besides the bracket; I guess I just got in a hurry).  My next task will be to find a new place for the mic.  I’ll probably just get another bracket, since I’m reluctant to remove the one that’s already there because it will expose the holes I drilled for the screws.  long face

Damn, that flash really shows how dirty my center console storage bin is.  Looks like it’s time for a thorough detail job.

Oh, yeah, it was like this all day long in the garage:

If I’m going to do much more work like this I’m going to have to break down and buy a shop fan.  The stand-fan I have is just too puny to move enough air to matter when it’s this hot.

RadioZilla On The Air

In my last entry I showed the portable base station I’ve been working on and mentioned needing to do a few more things to finish it. 

I ultimately decided not to build a front panel.  Instead I just fashioned a mic hanger from some ABS plastic and left it open to allow for ventilation.  The radio and the PowerGate both need air to keep cool, so I thought it best to keep both ends open to allow airflow.  So this is the final configuration (for now, anyway):

I also hacked together a UHF-style mount that will let me use a regular mobile antenna (provided it doesn’t need a ground plane).  It was fashioned from a 5/8” hole Larsen bracket fitted to two pieces of aluminum bar stock that I drilled and tapped to screw together.  The vertical piece elevates the Larsen bracket above the top of the flagpole to allow room for a cable to be connected to an SO-239 bulkhead fitting (i.e. antenna on one side, PL-259 cable on the other).  The vertical piece is screwed to a horizontal piece which is drilled to fit a 1 1/2” U-shaped pipe bracket. 

As an aside, I have no idea why I’ve been calling it RadioZilla, other than it’s big, bulky, and emits (RF) radiation.  It just sort of popped into my head.

RadioZilla Lives

As I mentioned in my last entry I’m working on a portable amateur base station.  I spent most of today cutting, grinding, drilling, and fitting the parts together. 

The first thing I had to do was build an internal frame in the Tuffbox 6 Space Rack Case so that it could handle the weight of the 33Ah SLA battery.  Here lies the first lesson I learned on this project: don’t be afraid to spend the money to get a decent case.  I tried to save on the case by buying the Tuffbox instead of a regular ATA-rated rack mount case.  I’ve probably spent enough in materials, tools, and time beefing up the Tuffbox to have bought the ATA case from the start. 

But now that I’ve integrated the steel frame, it doesn’t wobble at all.  You could probably stand on it, provided you made sure to stand over the steel parts.

Here’s a picture of the case with the frame installed and the battery mounted:

Once I had the frame and battery handled, the rest came together pretty quickly.  Here it is with all of the internal components installed, using a mobile antenna (off camera) and hooked up to the watt meter and SWR meter for testing:

As it is now, it’s functional, but I still have a few things to sort out.  First, I need an antenna and mount.  I’ve got a Harbor Freight 16-ft telescoping flagpole and a tripod base from a Sears work light that fit together.  All I need is to put a mount on it and to rig up a portable guy-wire system (I’m thinking paracord and tent stakes, or perhaps Homer buckets filled with water for situations where tent stakes are forbidden).  The other thing is to create some sort of front panel.  I’ve got a piece of ABS that I think I can cut into two pieces and make a fold-down front panel that doubles as a desk or folds out of the way if the desk is not needed (provided I can find the right set of hinges and support brackets at Home Depot).

The other lesson from this project: Harbor Freight is a double-edged sword.  They’ve got some really great inexpensive tools, which is good for when you have to do a job that needs a special tool that you won’t use a lot afterward, but things can be a bit hit or miss.  The el-cheapo air cutoff saw I bought was indispensable for cutting the angle brackets, and I wouldn’t have been able to drill half the holes in the case without this angle drill attachment.  But the not-that-inexpensive air hose I got from them burst while I was away on a short trip to Home Depot (amazingly I managed to do this project with only one trip today; I bought the other stuff a couple of weeks ago). 

Read You At S9+10 With A Hint Of Bubbles

I’ve been playing around at building a portable amateur base station that I can take to an emergency event and set up to run off of mains or batteries.

As usual, I tend to get a bit carried away, so I ended up with the following components:

It will all be mounted in a TuffBox 6 Space Rack Case (unfortunately, the site uses Flash, so you will have to click “Rack Cases” to get the right page) that I’m going to reinforce with some slotted angle stock from Home Depot because it seemed just a bit too flimsy for the battery (which weighs just over 24 pounds).

My task for this long weekend is to physically mount all the components into the case (which is complicated by the need to cut and assemble an internal frame using angle and flat slotted stock). Last night I did an electrical and radio function check, though, which is what led me to a “fun” RF discovery.

I brought all the stuff inside from the garage so I could work in air-conditioned comfort and I set it all up on the kitchen counter. After putting Power Pole connectors on several wires, I started connecting selected components to verify their function before hooking up the radio. After verifying that the DC Watt meter worked and that the power supply and PWRGate were working properly I connected the radio as well as the SWR meter and an antenna (I’m pretty paranoid about always having an antenna connected when applying power to a radio so that if there is an accidental key-up I don’t burn out the finals; one of these days I’m going to break down and buy a dummy load, though).

After verifying that the radio was getting power and that it could receive (based on using an HT from across the room grin ), I decided to try out the SWR meter, which meant keying up and transmitting. I set the power to low (5 watts) and hit the key and immediately heard a “BING” sound from nearby. I immediately let go of the switch, thinking that I’d blown something, which is when I realized that the sound had changed to a whirring noise and that it was coming from the automatic soap dispenser over by the kitchen sink. Apparently, even 5 watts of RF from across the room is enough to overload its sensor and activate the pump. This particular dispenser goes “BING” whenever it’s activated. Satisfied that I hadn’t blown anything in the radio, I played around with the meter a bit more and eventually hit the Tarrant County RACES repeater, although I wasted a bit more liquid soap in the process. smirk

User Interface Annoyanaces, Part 3574

Another user interface annoyance of mine are low-battery alarms.  I recognize that they can be useful, but I’ve encountered a few that deliver more annoyance than function (like the cell phone that I once had that would beep regardless of the phone’s vibrate settings).

The latest one to annoy me is the pager that I carry for rehab callouts.  It’s a Unication Alpha Elite model.  When the battery gets really low (25% or lower) it will beep once every so often, which is not unexpected.  However, last night at midnight it unleashed a full alert.  When I looked at it the only thing I could infer was that it was complaining about the battery, which was somewhere around 33% according to the meter.  There was no message and nothing was flashing.  It also did this about a month ago just before I changed the battery. 

So, it appears that it’s programmed to alert at midnight every night when the battery is below some preset voltage level.  Which seems designed to cause maximum annoyance.  Why midnight?  Why not just display “low battery” on the display and then go to beeps when it gets really low?  If my pager makes noise at midnight I expect someone to be trying to reach me not a battery problem. 

It seems to me that this is a badly implemented feature that was obviously not vetted by any real users before it was released. 

Lifting A Curse

I’ve had a computer sitting around in the closet for nearly two years now.  I originally bought it as a fairly inexpensive barebones kit that I was going to build out to give to my Mother for her birthday.  But after I built it I decided that it wasn’t quite what I wanted and so I shelved it and I ended up giving her a new HP for Christmas later that year.  So into the closet it went, only being pulled out long enough for me to scavenge the video card and memory for some other systems that needed them. 

About six months ago I decided to revive it.  It was pretty lagging edge, but still useful for a basic computer for someone who just writes a few documents and checks email/surfs the web.  I had found a video card that I’d forgotten that I had while searching for something else in my office, so all I needed was memory, which I found for $20 or so on eBay.  As I was putting it together I noticed that the tab at the bottom of the metal bracket on the video card wouldn’t seat correctly in the hole, so I took a screwdriver (do you see where this is going?) to try to “guide” it into position.  Unfortunately, the screwdriver slipped, and when it did it hit one of the tiny surface mount resistors on the motherboard, completely annihilating it and ruining the motherboard in the process. 

Now I was at a decision point:  abandon the system or replace the motherboard?  I almost abandoned it when I started pricing replacement motherboards.  The system was so far behind the curve that no one was making new ones for this socket configuration anymore, and all of the online retailers were asking ridiculous prices for such old technology.  But eBay came to the rescue with a lightly used motherboard of similar configuration. 

So… I replaced the motherboard but realized that I didn’t have the proper ATX plate insert for all of the motherboard connectors.  I went ahead without one, but it was nagging at me that it could cause problems.  But, it didn’t appear to have any adverse impact as the system booted right up the first time and loaded the OS without any problems.  Or so I thought.  Once I shut it down it wouldn’t come back on until I’d unplugged the power supply for a few minutes.  If I didn’t all that would happen is that the front panel power light would come on but nothing else would happen (no fans, no HD spinup, etc; like it was in hibernate mode).  I tested the power supply with my ATX PS tester, and it showed all green lights for all of the supply lines on the MB connector as well as all of the molex connectors.

I thought maybe I had some weird grounding issue, so I went back to eBay and managed to find what seemed to be the one remaining ATX insert for this motherboard on planet Earth (only $6.00!).  grin  Once I had it in hand I proceeded to remove the motherboard (which is always a royal pain), install the new plate, and check all grounding points to make sure they were in contact.  So I plugged it in, booted it up, and then shut it down.  Then I pressed the power button again.  No joy.  Same problem. 

At this point I’m convinced that this system is cursed and I decided to cannibalize it for parts.  But when I started my latest build I had two older-style ATX power supplies (including the Enermax) that I could not use in newer systems.  As a last-ditch effort to revive the system I swapped the original power supply for the Enermax.  And the system now works perfectly!  So the problem had been the power supply all along, despite the fact that my power supply tester showed no problems.  Either the PS was marginal for the new motherboard or it had gone bad while it was in storage. 

I guess the lesson learned is that if you suspect a power supply is bad to try another one even if the original tests OK (provided you have another PS on hand, of course). 

Now I have no idea what I’m going to do with this system; it was just sheer cussedness on my part that made me want to get it running again.  If someone is in desperate need of a new PC I’d be willing to give it away (it’d have to be someone local since the shipping would be prohibitive).  If memory serves, it’s an Athlon XP 2200+ with 1GB of RAM, an 80GB hard drive, a 16X DVD-RW drive, and it’s running openSUSE (11.0 I think).  No tech support or exorcist included.  grin

Packrat System Build

I tend to accumulate computer parts over time as I upgrade older systems or replace them.  I also keep an eye out for good sales on parts that I can either keep on hand as spares for current systems or use for new builds/upgrades.  So when the upgrade bug struck recently I already had a number of parts on hand, including a 500GB SATA drive, DVD-RW drive, a couple of ATX power supplies (including a really high-end Enermax 450W unit), and a really nice Cooler Master Centurion case.  I started looking around at motherboard and CPU combos.  What I wanted was a motherboard capable of supporting dual monitors and a multi-core AMD CPU.  I was also intending to run Linux, so as I came across motherboards I checked for compatibility of video, LAN, and audio drivers.

I eventually settled on the following setup from Newegg.com:

Not exactly bleeding edge, but I got all three of the above for $150, which is pretty good for a new system build.  While waiting for the parts to arrive I pulled the Enermax PS from another case where it had been sitting.  That was when I noticed that it had the older 20-pin ATX motherboard connector, rather than the 24-pin connector that the motherboard required.  Now some motherboards will run without the extra four pins (you just plug the 20-pin connector into the first 20 pins of the 24-pin connector on the motherboard).  However, the manual for this motherboard did not mention this as an option so I ended up having to shell out another $50 for an Antec Basiq 500W power supply.  A bit annoying, and now my budget build was starting to fell somewhat un-budget.  grin

But this was the only hiccup, as the system went together really smoothly once I had all the parts together.  I think it only took about an hour total to get it assembled.  Since my phone was handy I snapped a few photos for posterity (which also prompted my previous whining about user interface annoyances). 

Cooler Master Centurion with Antec PS installed, awaiting installation of components:

Motherboard and CPU:

Optical and Hard Drives:

All components installed:

There’s something satisfying about taking a bunch of boxes and parts and converting them into a pile of trash and a working computer.

User Interface Annoyanaces, Part 3573

I don’t usually bother using my phone for pictures, but it has a decent camera for a phone and it occasionally comes in handy.  But getting the pictures off the phone is kind of a pain.  I don’t have a USB cable for it, so I either have to pull the memory card (which involves turning the phone off, removing the back cover, pulling out the battery, pulling the card, putting it in a reader, and then reassembling everything) or send them to myself in email. 

Sending email is only slightly less annoying.  First, Verizon has put the photo options under a menu item called “Get It Now.”  This is not what one would intuitively expect for accessing your photos.  Once you successfully navigate to your photos, you can select “Options” and “Send,” which is not too bad.  But once you’ve sent the photo the phone returns to the main menu.  That’s both counter-intuitive and annoying, as I have to work my back down to the photos if I want to send another one.  It’s a minor thing in the grand scheme of things, but it’s yet another small user interface annoyance and something that could be fixed easily if someone at Verizon really cared about it.

Not Seeing The Advantage of Waiting

So it appears that the digital TV transition will move to June 12th from February 17th.  The primary reason given is that millions of people aren’t ready and will lose their TV service if the switch is made on the original schedule.  Frankly, I’m not sure what, if any, difference waiting will make.  If people haven’t arsed themselves to get ready by now they most likely won’t do anything between now and June 12th, either.  Even if we were to delay another year there will be a large number of people who aren’t ready. 

If we have to switch, then let’s just get it done and let the chips fall where they may.  Loss of signal is the only thing that will actually get the procrastinators motivated.  Those of us who paid attention have been ready for a while*.

* Most of my TV programming is delivered via Verizon FiOS, which handles everything for me.  I have one OTA TV in the kitchen, for which I bought a converter when they first became available.

Good Customer Service

One of my usual peeves is dealing with customer service.  So when I come across good customer service experiences, I suppose I should give credit where credit is due and write about them as well.  I had two good customer service experiences this week.

The first involves AT&T’s CallVantage VoIP service.  I’ve used them for my business line for a little over two years now and it was mostly trouble free.  The only problem I had was that I’d get bad call quality if I didn’t reboot the Telephone Adapter (TA) every month or two.  On Tuesday morning, though, I started getting crackling and hissing on the line when I tried to use it.  I did some basic troubleshooting and resolved that it appeared to be a physical problem with the TA.  So on Tuesday afternoon I called the CallVantage support number.  I was pleasantly surprised that it only took me about two minutes to reach a real person after navigating the VRU.  The second pleasant surprise was that the AT&T representative listened to me describe the problem and was able to diagnose that the port was bad on the TA (it also helped that I was able to let the rep listen to the noise on the CallVantage line by holding my phone’s microphone up to the speakerphone attached to the TA).  The rep put in a request to have a new adapter sent to me overnight via FedEx and explained what I would need to do upon receipt of the new unit.  Sure enough, FedEx came yesterday afternoon with the new adapter.  I installed it and called CallVantage support again.  I again got a representative within a couple of minutes and he was able to active the new TA within about 10 minutes (most of it was waiting on the TA to download its configuration data).  So, overall, I give AT&T CallVantage high marks for solving the problem quickly and efficiently.

The second incident involves my Surefire L4 LumaMax.  On Monday evening I tried to use it but the beam was very weak.  I thought it odd, because the batteries had been just fine earlier in the day, but I decided to change them anyway.  When I put the new batteries in, the light came on as soon as I screwed down the head and the switch wouldn’t turn it off.  I opened the light and pulled the batteries and when I looked inside I noticed that the tailcap spring was bent sideways, causing it to come in contact with the body and create a short that was causing the light to stay on.  So I unscrewed the tailcap to see what was wrong with the spring and when I did little bits of plastic and metal fell out.  The switch assembly had disintegrated.  I had read on some of the flashlight forums that people had experienced failures with the Z57 tailcap but I had thought mine would not have the problem since it had been working for a year (most of the people with problems seemed to have them within days of purchase).  I went to the Surefire website to get their contact info.  I started to call their tech support line, but it was after hours for them (they close at 5:00pm Pacific, which is 7:00pm here), so I tried their email support.  By Wednesday morning I hadn’t heard from them so I went ahead and called them.  I got in touch with one of their techs within about a minute and as soon as I described the problem he said they’d send me a new tailcap assembly.  Even after confirming my address, the whole call was probably only about five minutes.  So, I give Surefire’s phone support high marks, but I will have to deduct a demerit for the email support experience.  Frankly, I was kind of expecting this to happen, since a lot of people on the forums had complained about their email support, but enough people had managed to get a response that I decided to risk it.  Still, if Surefire isn’t going to consistently answer their emails, they ought to just remove the email option from their website.  Anyhow, once you get in touch with them, Surefire is known for having good warranty and technical support.